Thinking about boosting your home’s energy efficiency and curb appeal? Learn how to install insulated siding the right way with this comprehensive, step-by-step guide designed for DIYers and professionals alike.


Understanding Insulated Siding: What It Is and Why It Matters

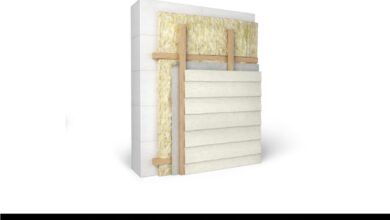
Before diving into the installation process, it’s essential to understand what insulated siding actually is and why it has become a go-to choice for modern home exteriors. Unlike traditional vinyl or fiber cement siding, insulated siding comes with a rigid foam backing permanently attached to the panel. This foam layer—typically made from expanded polystyrene (EPS)—enhances thermal performance, reduces air infiltration, and improves overall energy efficiency.
Types of Insulated Siding Materials
There are several types of insulated siding available on the market today, each with its own benefits and ideal use cases. The most common include:
- Insulated Vinyl Siding: The most popular option due to its affordability, durability, and low maintenance. It combines PVC panels with a foam insulation layer.
- Insulated Fiber Cement Siding: Offers superior fire resistance and durability but is heavier and more expensive. Brands like James Hardie offer insulated versions.
- Insulated Metal Siding: Often used in commercial applications but gaining traction in high-end residential builds for its strength and longevity.
Choosing the right material depends on your climate, budget, and aesthetic preferences. For most homeowners, insulated vinyl is the best balance of performance and cost.
How to install insulated siding – How to install insulated siding menjadi aspek penting yang dibahas di sini.
Benefits of Installing Insulated Siding
There are compelling reasons to choose insulated siding over traditional options. According to the U.S. Department of Energy, proper exterior insulation can reduce heating and cooling costs by up to 20%. Insulated siding contributes to this by:
- Improving R-value (thermal resistance) of your home’s exterior.
- Reducing thermal bridging through studs and sheathing.
- Minimizing air leakage when installed correctly with proper sealing.
- Enhancing soundproofing, making your home quieter.
- Increasing resale value due to improved energy efficiency.
“Insulated siding isn’t just about looks—it’s a performance upgrade that pays off over time.” — Energy Efficiency Expert, Green Building Council
How to Install Insulated Siding: Essential Tools and Materials
Proper preparation is half the battle when it comes to a successful siding installation. Before you begin, gather all the necessary tools and materials to ensure a smooth, efficient process. Having everything on hand will prevent delays and help maintain consistent workflow.
Basic Tools Needed for Installation
Most of the tools required are standard for exterior home projects. Here’s a checklist of essentials:
- Measuring tape and chalk line
- Utility knife or tin snips (for cutting foam-backed panels)
- Power drill with screwdriver bits
- Circular saw or siding cutter
- Level and straightedge
- Ladder or scaffolding (for multi-story homes)
- Nail gun or screw gun (recommended for speed and precision)
- Safety gear: gloves, goggles, dust mask
Using a pneumatic coil siding nailer can significantly speed up the process, especially for large projects. Make sure fasteners are corrosion-resistant and approved by the manufacturer.
How to install insulated siding – How to install insulated siding menjadi aspek penting yang dibahas di sini.
Materials Checklist for a Complete Project
Beyond the siding panels themselves, you’ll need several complementary components to ensure a weather-tight, durable installation:
- Insulated siding panels (calculate square footage with 10% extra for waste)
- Weather-resistant barrier (WRB) such as housewrap (e.g., Tyvek)
- Starter strips
- J-channel, corner posts, and trim pieces
- Window and door flashings
- Zip tape or butyl tape for sealing seams
- Fasteners: nails or screws (typically 2–3 inches long, with large heads)
- Expansion joints (for long wall sections)
Always refer to the manufacturer’s installation guide—brands like Mastic, Alside, and CertainTeed provide detailed specifications for compatible materials and fastening patterns.
How to Install Insulated Siding: Pre-Installation Preparation
Skipping prep work is one of the most common mistakes in DIY siding projects. Proper preparation ensures a flat, secure surface for your siding and prevents future issues like moisture intrusion or uneven appearance.
Inspect and Repair the Existing Wall Surface
Begin by removing old siding if present. Inspect the underlying sheathing for rot, warping, or water damage. Replace any compromised plywood or OSB boards. Ensure the wall is structurally sound and free of protruding nails or staples.
How to install insulated siding – How to install insulated siding menjadi aspek penting yang dibahas di sini.
If you’re installing over existing siding, verify that it’s flat and securely attached. Some manufacturers allow installation over wood or composite siding if it’s in good condition, but never over loose or deteriorating material.
Install a Weather-Resistant Barrier (WRB)
Once the sheathing is sound, apply a high-quality housewrap. Start from the bottom and work upward, overlapping each course by at least 6 inches. Use cap stapling or approved tape to secure edges and prevent wind uplift.
Pay special attention to vulnerable areas:
- Window and door openings: Install sills and head flashings before wrapping.
- Wall penetrations: Seal around pipes, vents, and electrical outlets.
- Corners and seams: Use reinforced tape or liquid flashing for extra protection.
The WRB acts as a secondary defense against moisture, so don’t rush this step. For more information on best practices, visit Building Science Corporation, a leading resource on building envelope performance.
How to install insulated siding – How to install insulated siding menjadi aspek penting yang dibahas di sini.
How to Install Insulated Siding: Step-by-Step Installation Guide
Now that your wall is prepped, it’s time to begin the actual installation. This section breaks down the process into manageable steps, ensuring accuracy and adherence to manufacturer guidelines.
Step 1: Install Starter Strip
The starter strip is crucial for aligning the first course of siding. It provides a nailing flange and ensures panels lock together tightly at the bottom.
- Measure and level a chalk line around the perimeter of the house, typically 1/4 inch below where the first panel’s bottom edge will sit.
- Attach the starter strip with nails every 12–16 inches, keeping it level and snug against the foundation.
- Stagger joints between starter strip sections by at least 6 inches.
Make sure the starter strip is compatible with your siding brand—mixing components from different manufacturers can lead to poor fit and performance.
Step 2: Begin with Corner Posts and J-Channels
Install vertical trim pieces before laying the field panels. Corner posts go on outside corners, while J-channels are used around windows, doors, and where siding meets other materials.
How to install insulated siding – How to install insulated siding menjadi aspek penting yang dibahas di sini.
- Use a plumb line to ensure corner posts are perfectly vertical.
- Nail corner posts every 16–24 inches, allowing for slight expansion in hot weather.
- For J-channels, align them so the siding will slide in smoothly and overlap properly with adjacent surfaces.
Leave a 1/4-inch gap at the top and bottom of each piece to accommodate thermal expansion.
Step 3: Install the First Course of Siding
Start at one corner and work horizontally. Slide the first panel’s bottom edge into the starter strip and the top edge under the nailing hem of the previous row (if applicable).
- Align the panel with the corner post, leaving a 1/8-inch gap for expansion.
- Fasten nails in the center of the nailing slots—never at the top or bottom—to allow for movement.
- Stagger panel joints by at least 24 inches from adjacent rows to avoid weak points.
Use a level to check alignment frequently. Misaligned panels are difficult to correct later.
How to Install Insulated Siding: Handling Windows, Doors, and Trim
One of the trickiest parts of siding installation is dealing with openings. Improper flashing or cutting can lead to leaks and moisture damage. Follow these best practices for a watertight seal.
How to install insulated siding – How to install insulated siding menjadi aspek penting yang dibahas di sini.
Flashing Around Windows and Doors
Proper flashing is non-negotiable. Water infiltration around windows is a leading cause of siding failure.
- Start with the sill: Install a sloped piece of flashing that directs water outward.
- Apply head flashing above the window, overlapping the WRB and extending into the window frame.
- Use jamb flashing on the sides, integrated with the WRB and window flange.
- Seal all joints with compatible tape or liquid flashing.
For detailed flashing techniques, consult the APA – The Engineered Wood Association, which provides field guides for exterior wall systems.
Cutting and Fitting Panels Around Obstacles
You’ll need to cut panels to fit around pipes, vents, and irregular shapes. Use a circular saw with a fine-tooth blade or a utility knife for vinyl.
- Score and snap vinyl panels carefully to avoid cracking.
- For curved cuts, use aviation snips or a jigsaw.
- Always wear safety goggles when cutting.
When fitting around outlets or fixtures, leave a small gap and use foam backer rod and caulk to seal.
How to install insulated siding – How to install insulated siding menjadi aspek penting yang dibahas di sini.
How to Install Insulated Siding: Sealing, Finishing, and Final Checks
The final stages of installation are just as important as the beginning. Proper sealing and finishing ensure long-term durability and performance.
Sealing Joints and Gaps
Even with interlocking panels, some gaps may remain—especially around trim and corners. Use manufacturer-recommended sealants to close them.
- Apply silicone or acrylic latex caulk to gaps larger than 1/8 inch.
- Use backer rod in wide joints before caulking.
- Avoid over-caulking, which can trap moisture and lead to rot.
For insulated vinyl, many joints are designed to lock without sealant, but critical areas like roof-wall intersections should be sealed.
Final Inspection and Cleanup
Walk around the house and inspect every section. Look for:
How to install insulated siding – How to install insulated siding menjadi aspek penting yang dibahas di sini.
- Proper panel alignment and locking.
- Correct fastener placement (centered in slots, not too tight).
- Missing or damaged pieces.
- Open gaps or unsealed penetrations.
Clean up debris and recycle packaging materials. Rinse down the siding with water to remove dust and chalk marks.
Common Mistakes to Avoid When Installing Insulated Siding
Even experienced DIYers can make errors that compromise the integrity of the siding. Being aware of common pitfalls can save time, money, and future repairs.
Over-Tightening Fasteners
One of the most frequent mistakes is driving nails or screws too tightly. Insulated siding expands and contracts with temperature changes. If fasteners are too tight, the panels can buckle or warp.
“Nail it right, not tight.” — Professional Siding Installer
Always leave a slight gap between the nail head and the siding surface—about the thickness of a dime.
How to install insulated siding – How to install insulated siding menjadi aspek penting yang dibahas di sini.
Ignoring Expansion Gaps
Failing to leave space at corners, windows, and between long panels can lead to bulging or cracking. Most manufacturers recommend a 1/4-inch gap at vertical joints and 1/8-inch at horizontal overlaps.
Use spacers or a nail set to maintain consistent gaps during installation.
Mixing Components from Different Brands
While some parts may look similar, they’re not always compatible. Using a CertainTeed corner post with a Mastic panel can result in poor fit, reduced insulation value, and voided warranties.
Stick to one manufacturer’s system for best results.
How to install insulated siding – How to install insulated siding menjadi aspek penting yang dibahas di sini.
Can insulated siding be installed in cold weather?
Yes, but with caution. Cold temperatures make vinyl more brittle, increasing the risk of cracking during handling and installation. If installing below 40°F (4°C), allow panels to acclimate in a warm area for 24 hours before use. Cut carefully and avoid excessive force when snapping panels together.
Do I need a building permit to install insulated siding?
In most jurisdictions, yes. Exterior renovations often require permits, especially if you’re altering the building envelope or adding insulation. Check with your local building department before starting. Permits ensure compliance with fire, insulation, and structural codes.
How to install insulated siding – How to install insulated siding menjadi aspek penting yang dibahas di sini.
How long does insulated siding last?
High-quality insulated siding can last 40–50 years or more with proper maintenance. Factors like climate, sun exposure, and installation quality affect lifespan. Most manufacturers offer 30–50 year limited warranties, including fade and hail resistance.
Can I install insulated siding over existing siding?
Sometimes. If the existing siding is flat, securely attached, and in good condition, some insulated vinyl products can be installed over it. However, this may void warranties or reduce insulation effectiveness. Always consult the manufacturer’s guidelines and consider removing old siding for optimal performance.
How to install insulated siding – How to install insulated siding menjadi aspek penting yang dibahas di sini.
Is insulated siding worth the extra cost?
For most homeowners, yes. While insulated siding costs 10–20% more than standard siding, the energy savings, improved comfort, and increased home value often justify the investment. According to the National Association of Realtors, exterior upgrades like insulated siding offer a 75–90% return on investment at resale.
Installing insulated siding is more than a cosmetic upgrade—it’s a strategic investment in your home’s efficiency, durability, and value. By following the steps outlined in this guide, avoiding common mistakes, and using quality materials, you can achieve professional-grade results. Whether you’re a seasoned DIYer or hiring a contractor, understanding how to install insulated siding properly ensures your home stays protected and energy-efficient for decades to come.
How to install insulated siding – How to install insulated siding menjadi aspek penting yang dibahas di sini.
Recommended for you 👇
Further Reading: